Today, I want to talk a bit more about Docker. My previous post focused on the basics of Docker (what it is, what problem it solves) and how to run an image that already exists. This time, I’ll run through building your own image from scratch so you can containerize your own application.
This is part 2 in a series on Docker and containers.
The Dockerfile
Since we’ve already covered how containers work, let’s jump right into building an image. Drawing from the previous post, a Docker image is a specification for how a Docker container should run. The image is defined in a Dockerfile, which is a series of special commands that the Docker runtime executes to build the image. Each command represents a new “layer” of the image. Images always start with a FROM command indicating which image should be used as a source, and make modifications to that image which are stored as “layers” on top of the original specification.
As an example, let’s take a look at the etheos Dockerfile.
| |
There’s a lot going on here, but hopefully the domain language of the Dockerfile is easy enough to understand with a quick read.
FROM
| |
As mentioned, the FROM command allows a Dockerfile to specify the source image that should be used. In the case of etheos, this is alpine:3.17.2. Alpine is a Linux distro focused on security and small runtime size. The :3.17.2 indicates which version we should use. You can ignore the AS command for now - we’ll cover that further down.
You may see the format imageName:version in many places. The two pieces of this syntax are referred to as a “repository” (left side of the colon) and “tag” (right side of the colon). When we reference an image, these two pieces of information are always required.
If you are wondering where the tag is in a command like docker run -it darthchungis/etheos, docker defaults to using the latest tag if no tag is specified. So the full command is actually docker run -it darthchungis/etheos:latest. It is a good idea to always use a specific image version to avoid accidentally pulling in regressions as newer images are published.
Registries
Speaking of image names, there are semantics that allow you to pull images from other sources as well. These are referred to as registries. The default registry is hub.docker.com. If you specify an image repository and tag without a registry URL, hub.docker.com is used as a default. If you want to specify a separate registry (e.g. Azure Container Registry, or a self-hosted option), you can simply prefix the URL of the registry to the image.
I host a private registry for CI testing of etheos. This allows publishing an untested version of the etheos image without making it publicly available. You can see in the pipeline yaml where the image gets published, and later, consumed. Note that this image is not available for public consumption because access to the registry is managed by Azure rules.
| |
| |
WORKDIR
| |
The next command we see is WORKDIR. This command sets the current working directory for the image. Any subsequent commands in the Dockerfile such as COPY, RUN, CMD, and ENTRYPOINT (more on those later) will be executed with this directory as the current working directory.
COPY
| |
The next command in the Dockerfile is COPY. This command allows us to copy files into the image’s file system for that particular layer. The syntax is COPY [host_path] [container_path]. Any files copied in this way will be available when the built image is later run as a container, at the specified target container_path. As previously mentioned, the WORKDIR sets the working directory for the remaining commands in the Dockerfile, so the line COPY . . copies everything from the build context (the repository root) recursively to the WORKDIR, or /build.
When copying files from the host, COPY is dependent on the “build context” that is set by the build command. Usually, this context is the same directory as your Dockerfile. A common pattern for single-image software projects (including etheos) is to keep a top-level Dockerfile at the root of the repository so that it is easy to copy any files generated by the build system into the image.
RUN
| |
The easiest and most obvious way to make meaningful changes to an existing image on a new layer is to run a command to do something. This is where the RUN command comes in - it allows us to run a shell command using the base image’s default shell. Note that the shell used by RUN may be changed via the SHELL command.
You may be wondering why, in this Dockerfile, I’ve chosen to use the && syntax for chaining commands together in a single RUN instruction rather than using individual commands. Surely readability and maintainability is much better when commands are on their own line! The answer is simple: each new layer of a docker image adds overhead in size and time complexity for building and pulling the image. Images are much more efficient when they have fewer layers. As such, it is a best practice to collapse as many RUN commands down as possible. One exception is when debugging container build errors, it is easier to validate changes when the build cache can use previous layers, since it takes less time to build up the existing image. In this case, separating the RUN instructions is the preferred approach.
Generally, RUN commands install dependencies and execute container setup. In this first RUN instruction, the etheos image installs build-time dependencies and executes the linux build script.
FROM - again?
| |
If you recall from the first time we covered FROM, I mentioned we’d get to the AS part of the command later. Well, now is the time!
etheos uses a process called “multi-stage” builds. Multi-stage builds allow you to select multiple images as sources, and use a prior “stage” (each stage being marked by a new FROM command) as a source for files. This means we can use one stage of the Dockerfile as a build stage, selectively copying outputs to the final image. When we write FROM {image} AS {name}, we name a particular stage; this name can be used as an additional argument to COPY commands to specify the source from which files should be copied.
You can see this usage in a future copy command, which takes the output of the build from the build stage of the Dockerfile.
| |
USER
| |
Hopefully by this point the syntax of the Dockerfile is starting to make sense, so we’ll jump to the commands that haven’t been covered yet. Next up on the list is USER, which specifies which Linux user (and optionally, group) the eventual entrypoint and image command are executed as. By default, docker images will run as root within the container, which has implications for any files mounted into the container and is generally less secure. It is highly recommended to specify a non-root user when building a Docker image.
The user can be a ‘uid’ rather than a friendly name. In the case of etheos, we run the container as the etheos user, which is created in the RUN command of the Dockerfile immediately prior:
| |
VOLUME
| |
The VOLUME command marks a path (or paths) as volumes in the image. This allows the files stored on the volume to be copied out of a running container and persisted between runs of the container, without needing to explicitly mount a volume via docker run -v.
EXPOSE
| |
EXPOSE marks a network port for exposure. This allows the Docker runtime to automatically know which ports the container will be listening on. Docker provides a -P flag (note the casing difference) which will take all ports marked via the EXPOSE command and automatically bind them to random ports on the host system. This can be convenient if there are many ports in an image, although you will need to examine the port mapping to figure out which ports are available and what container ports they each map to.
CMD (and ENTRYPOINT)
| |
The final command in our Dockerfile is CMD. This command sets which binary is executed by the container when it is run or started. In the case of etheos, we simply launch the server with no arguments, which is the standard way of running it.
The complement to CMD is ENTRYPOINT, which is what actually goes to execute the CMD command in the container. The default entrypoint for docker is /bin/sh -c, but no default command is set. Setting the command specifies what argument will be passed to the entrypoint. The full invocation of etheos then looks like: /bin/sh -c ./etheos (remember that the WORKDIR previously set the current working directory).
Building and Pushing
Now that we understand the format of the Dockerfile, let’s move on to what we can actually do with it. The whole point is to assemble an image for redistribution, so let’s talk a bit about the ‘build’ and ‘push’ commands.
The docker build command
The build command is relatively straightforward:
docker build -t {image_tag} {context_folder}
Where -t specifies the image repository and tag, and context_folder specifies the directory to send to the build command as the build context (for things like COPY).
In the case of etheos, you can see this invoked in the build pipeline:
| |
Here, the image is named darthchungis/etheos and given the $FULL_VERSION tag ($FULL_VERSION being some pipeline env var magic to expand to 0.7.1.{rev}). This way, each new build generates an image with a different tag so that prior versions do not get clobbered.
On your local system, you can see the results of an image build by running docker images. The tag you specified will be shown in the list, with a timestamp indicating it was recently built.
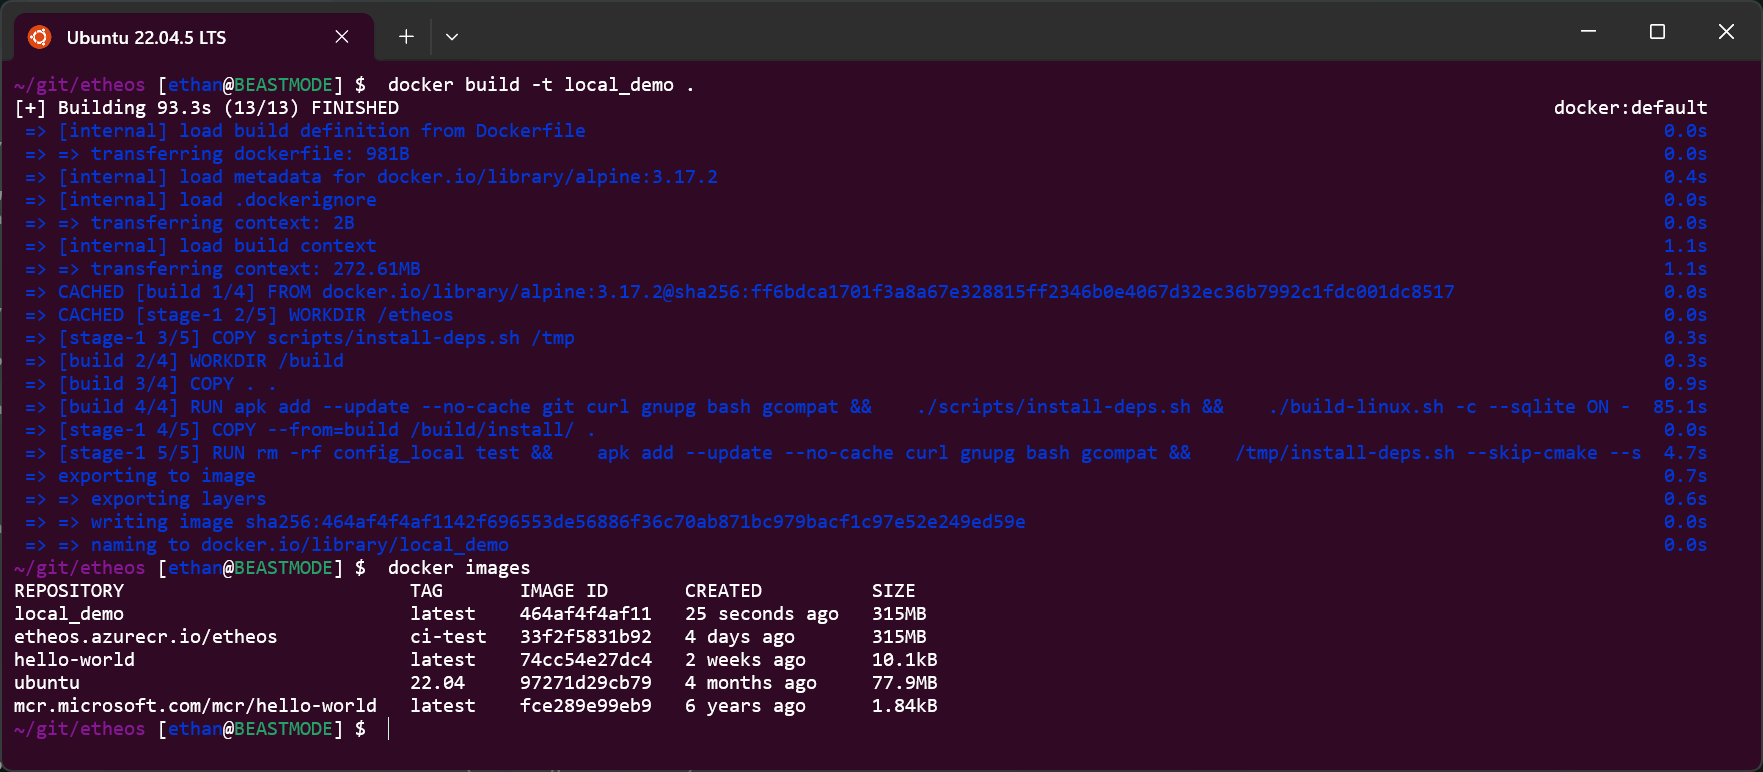
If a tag is not specified with a repository name, as in the above example with local_demo, the latest tag is used as a default.
The docker push command
After an image is built, the next thing to do is share it with the world! This docker push is the mechanism for sharing an image so it may be easily consumed by others via docker pull. The push command is relatively straightforward as well:
docker push {image_tag}
Remember that a reference to a docker image is actually three parts (two of which are often omitted):
- The registry name (default value:
hub.docker.com) - The repository name (default value: unset)
- The image tag (default value:
latest)
In the case of etheos, publishing the image is a matter of ensuring it has both the latest tag (which is clobbered on every build) and a unique version tag that can be traced back to the pipeline that built it.
| |
Because the default value is hub.docker.com, this will publish a public image to Docker hub with the repository darthchungis/etheos and the tags latest and $FULL_VERSION.
Note that you must be authenticated to the remote registry in order to push an image. On Docker hub, your username is the first part of the repository (in my case, darthchungis). The command docker login -u darthchungis provides an interactive prompt for your password. Automated systems such as CI pipelines usually store the credentials in a secret and pass that to a specialized task to authenticate with the registry.
Wrapping up
That’s about it for this one. Between this explanation and part 1, you should have enough requisite knowledge to start exploring other features of Docker.
Here are some helpful documentation links:
- The Dockerfile: https://docs.docker.com/reference/dockerfile
- The
dockercli: https://docs.docker.com/reference/cli/docker/
Next I plan to cover more advanced deployment scenarios, such as docker compose and Kubernetes. Docker compose allows specification of container runs in a yaml format, which makes it very useful for setting up development environments, especially if you want to test integration with an external system (e.g. SQL Server or MySQL). Kubernetes is a full-featured, distributed, orchestration platform that provides reliability and hosting capabilities. It is extremely powerful and makes use of containers as compute units. Discussing both should provide for an interesting read.
Until next time - happy dockering!